Flashing led lights when you go Incognito Mode


Last week, I received one of the wifi-controller for my Wifi bulb (milight) and a crazy thought came across my mind to make it flash whenever I go incognito Mode on my chrome browser on a LINUX machines.
To accomplish this crazy idea, I have used the following components:
- Wifi Bulb with its wifi-controller (Milight)
- RaspberyPi running a node-red server
- Linux PC – running chrome browser and of course a script which was written in Bash
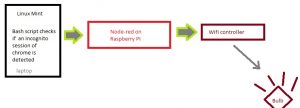
How it works?
- LinuxPc (running a bash script, when an incognito session is detected, it makes a curl towards the webservice of node-red)
- The node-red flow captures this data from the curl and then it sends a requests to the wifi-controller
- The wifi controller then sets the value that it has got from the node-red
1. Configuring the Wifi Bulb and the Wifi controller
The wifi bulb can be bought on Ebay along with the wifi-controller
- Download a milight APP from Play-store (I’m currently using this app (Mi-Light) which is available on play store https://play.google.com/store/apps/details?id=mi_light.mi_light )
- Once the wifi-controller is connected to a power socket, in order to setup the whole thing, you will have to connect to its wifi with your phone.
- Once connected, you can specify the network SSID/username/passwd of your wifi router on the settings of the wifi-controller so that it can connect to your local network
- Having done so, your wifi-controller should be able to connect to your network
- Use the app on your phone, it will already detect the controller
- Linking your wifi bulb with the controller
- On the APP, choose a setup for your bulb (or follow the manually of the wifi controller)
- Poweroff the wifibulb
- Poweron your wifibulb
- You got around 1-5seconds to press the linking button on the app so as the bulb will be able to communicate to the wifi controller
- You should be able to change your bulb colour and have some fun with the different modes available on the App.
2. Installing Node-red On raspberry Pi,
This guide is enough to install the node-red http://nodered.org/docs/hardware/raspberrypi
3. Install a milight node on node-red
The instructions is clear to install the node http://flows.nodered.org/node/node-red-contrib-milight
npm install node-red-contrib-milight
4. Use the following codes on the node-red interface (http://IP:1880)
On for right-hand-side, import->clipboard and input this codes
[{"id":"d069937b.c169f","type":"MiLight","z":"7bd37bf2.0d1004","name":"MiLight","bulbtype":"rgbw","zone":"0","ip":"10.0.0.22","broadcast":false,"x":574.4285888671875,"y":215.4285888671875,"wires":[]},{"id":"34f440af.446ae","type":"http in","z":"7bd37bf2.0d1004","name":"Get-HttpRequest/test","url":"/test","method":"get","swaggerDoc":"","x":159.85714721679688,"y":69.4286117553711,"wires":[["d9a2fe17.dfe71","4e822b8.4c444d4"]]},{"id":"d9a2fe17.dfe71","type":"debug","z":"7bd37bf2.0d1004","name":"","active":true,"console":"false","complete":"payload","x":558.1428833007812,"y":73.57146453857422,"wires":[]},{"id":"4e822b8.4c444d4","type":"function","z":"7bd37bf2.0d1004","name":"checkInput","func":"\nif ( msg.payload.power == \"on\") {\n msg.payload = 'on';\n}\n\nelse if ( msg.payload.power == \"off\") {\n msg.payload = 'off';\n}\n\nelse if ( msg.payload.power == \"white\") {\n msg.payload = 'white';\n}\n\nelse if ( msg.payload.power == \"disco\") {\n msg.payload = 'disco';\n}\nelse {\n //random colors :D\n msg.payload= Math.floor (Math.random() * 100) ;\n}\n\nreturn msg;\n\n","outputs":"1","noerr":0,"x":364.857177734375,"y":214.5714569091797,"wires":[["d9a2fe17.dfe71","d069937b.c169f"]]},{"id":"94a44768.5188e8","type":"inject","z":"7bd37bf2.0d1004","name":"off","topic":"","payload":"{ \"power\": \"off\" }","payloadType":"json","repeat":"","crontab":"45 05 * * 1,2,3,4,5","once":false,"x":128,"y":307,"wires":[["4e822b8.4c444d4"]]},{"id":"87790643.e589e8","type":"inject","z":"7bd37bf2.0d1004","name":"AlarmDisco","topic":"Disco","payload":"{\"power\":\"disco\"}","payloadType":"json","repeat":"","crontab":"30 05 * * 1,2,3,4,5","once":false,"x":105,"y":218,"wires":[["4e822b8.4c444d4"]]}]
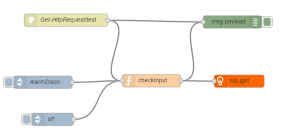
How the flow looks like in Node-Red
5. Bash Scripts on a linux console
#!/bin/bash

while ( true)

do

x=`ps -ef |grep chrom |grep "disable-databases"`

if [ ! -z "$x" ] ; then

echo "Incognito Mode On"

curl -XGET http://10.0.0.9:1880/test?power=off -m 1 2>/dev/null

else

echo "Normal Browsing"

curl -XGET http://10.0.0.9:1880/test?power=white -m 2> /dev/null

fi

done
See the GIF The works in progress..
On your chrome, just switch to incognito mode and see this works 😀
You can tweek the codes, to do anything you want 🙂
Node-red is really amazing for IOT projets 😉